ConnectPOS supports multiple devices, one of them is the Star model. In this article, we will guide you through the full steps of setting up Star receipt printers and cash drawers.
As a web-based POS system, when you print the receipt, a print preview popup will appear. To make things simpler for you, we also introduce the way to bypass the print dialog box in Chrome.
Set up Star device #
Receipt printer #
Based on the instruction from the manufacturer to install your printer. For the latest drivers version, please visit here.
After setting up the printer, you need to define the size of your receipt paper. It’s highly recommended for 72mm wide paper.
Then it’s time to set up your print size settings in Google Chrome printer preferences.
1. Find your order in the Order Lists setting
2. Click Receipt.
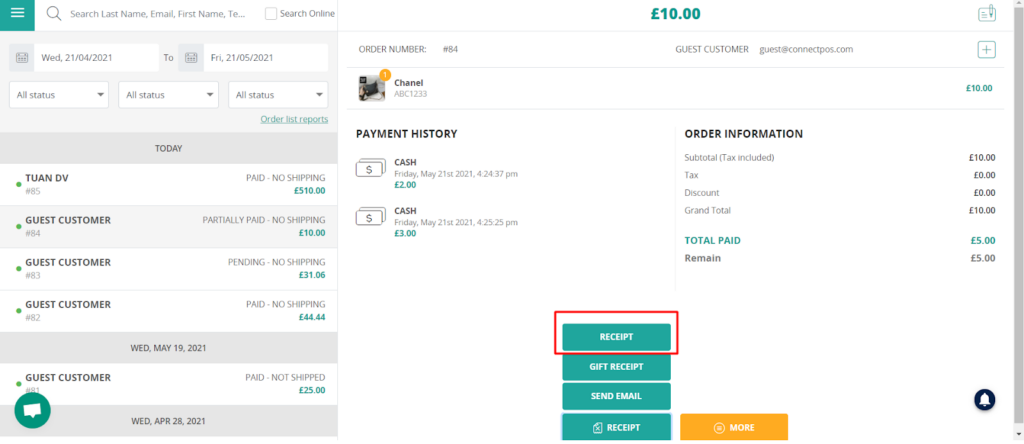
3. This will take you to the print preview screen. If the Star printer is not your default printer, click change and select the Star printer from the list.
4. Untick print headers and footers and change the paper size to 72mm – 2000mm or 72mm – receipt.
Note: If you tick headers and footers, the printer will auto cut at the main receipt and add a URL and other irrelevant information on your receipts.
Cash drawer #
For Windows
Set up your cash drawers so it opens when you print a receipt.
1. Plug the RJ12 connector cable (the one that looks like a phone line) into the receipt printer from the cash drawer.
2. Go to your devices and printers control panel on your Windows device.
3. Right-click on your receipt printer and select Printer Properties
4. Click on the device settings tab
5. Change the Peripheral Unit Type to Cash Drawer and set the Peripheral Unit 1 and 2 options to Document Bottom.
6. Click OK to complete the setup.
If you want your cash drawer to open before the receipt prints you can set the Peripheral Unit 1 and 2 options to Document Top.
For Mac
Set up your cash drawers so it opens when you print a receipt.
1. Plug the RJ12 connector cable (the one that looks like a phone line) into the receipt printer from the cash drawer.
2. Go to this link in your safari browser. This will open CUPS.
Note: If you receive the error The web interface is currently disabled. Run “cupsctl WebInterface=yes” to enable it.
– Click the magnifying glass in the top right-hand corner of your screen and search for Terminal.
– In Terminal, enter cupsctl WebInterface=yes and press return on your keyboard.
3. You will now be able to see your installed printers.
4. Select your Star printer from the list of available printers
5. From the drop-down menu, select Set Default Options.
6. Select Cash Drawer Control, choose Open Drawer 1 and 2 under Cash Drawer.
7. Click the Set Default Options button.
Bypass print preview popup in Chrome #
We highly recommend using Chrome for ConnectPOS.
1. Close all Chrome windows
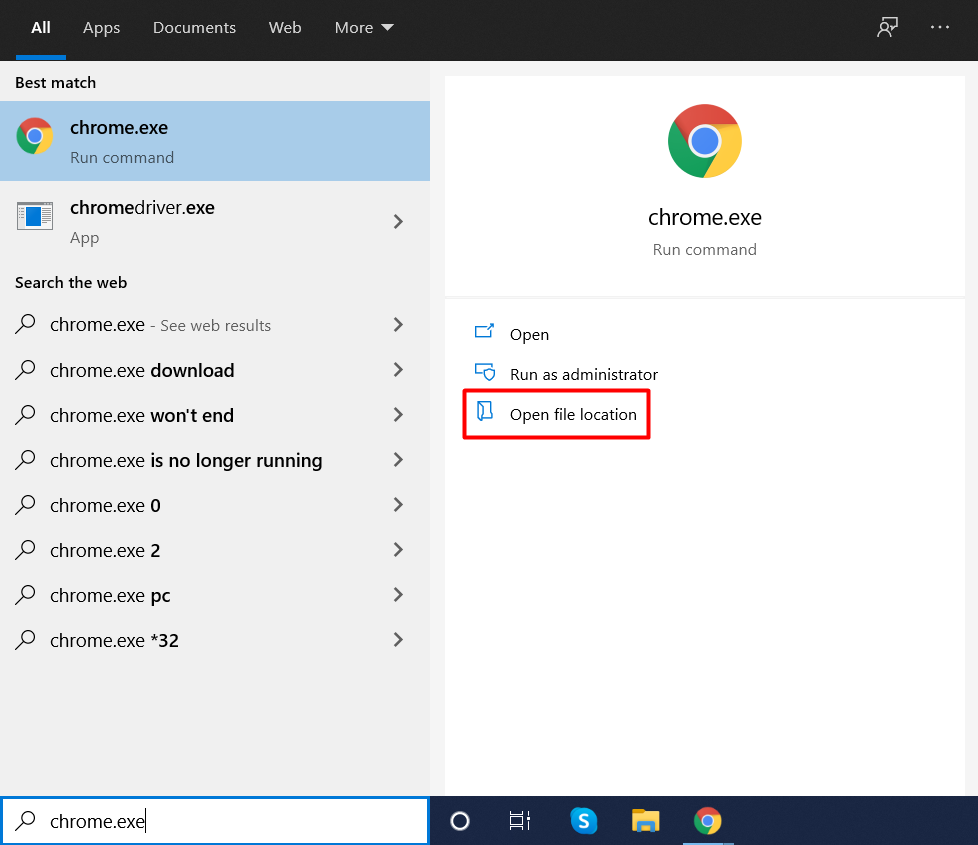
2. Then click on the search bar at the bottom left corner
3. Enter Chrome.exe, and in the results, on the right click on Open File Location.
4. In the pop-up window, drag and drop Chrome to your Desktop. There’s a ‘Create Link in Desktop’ message pop up as you drag, but when you release the mouse, a menu will pop up. Click on Create Shortcut Here.
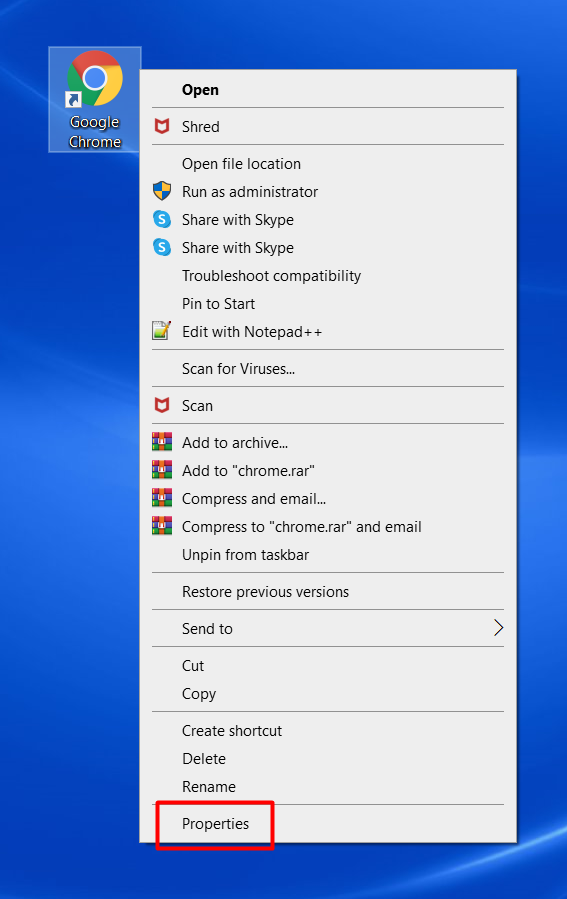
5. Click on Properties when you right-click on the new Chrome icon.
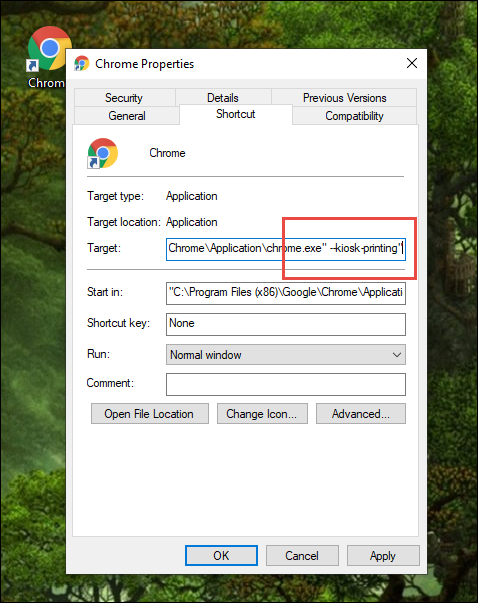
6. In the Target field, click after the .exe”, add a space, then enter the text exactly as pictured below. The exact entry after .exe” is: space-hyphen-hyphen-k-i-o-s-k-hyphen-p-r-i-n-t-i-n-g-doublequote.
Please note that it needs to have the double-quote at the very end, as pictured below. You can triple-click and copy the line below, click after the .exe”, and paste it directly and it will be correct: –kiosk-printing”
7. Click Apply.
Note
1. Choosing to bypass print preview is the best option when you use a single printer. If you’re using more than 1 printer, it’s better to leave the popup as you can select which printer to use
2. With this set-up, this icon and only this icon will open Chrome in Kiosk mode, where it will just print directly to the Default Printer in your Devices and Printers settings.
3. If you need the flexibility to choose a different printer, you can open Chrome from a different shortcut icon, or from your Start menu.
4. If you need to make the print dialog box come up again, repeat the first step above, remove everything after the .exe that you added, then Apply. Or you can just open Chrome from the Start menu or the Windows Search.
Reference:
– https://www.websitesupport.info/hc/en-us/articles/360024709193-Bypass-the-Print-Dialog-Box-in-Chrome
– https://www.netohq.com/support/s/article/install-your-star-printer-and-cash-drawer


